Thursday, September 30, 2010

Hello October!

Tomorrow is the start of October and that means it's pumpkin season. For the past few years, I have always celebrated with some of my favorite cookies. I look forward to this time all year. Technically, I could make these cookies any day of the year, but for some reason they taste so much better during October. Ideally, I would be able to look out my window and see the leaves changing and feel the brisk, crisp air blowing. Well, I live in Tucson. Today, the last day of September, it was a blistering 103 degrees and we don't have trees with real leaves that could ever change color. It doesn't feel or look like Fall outside, but inside it smells like pumpkin, cinnamon, and nutmeg. I feel like making a hot cup of tea and bundling up in a big blanket. Too bad the AC is on full blast and at 8:30 at night, it is still 93 degrees outside. Regardless, I can still pretend like it's changing seasons and eat these yummy cookies.

I need to give credit to my good friend Ashley for these cookies. This recipe is from her and they have been one of my favorites. I made these last year and was cleaned out by my other med students. The frosting recipe is by Paula Dean and is by far the best cream cheese frosting I have ever had. I don't like frosting very much, but I could eat this stuff plain by the spoonful. These are so soft and just the right about of sweetness. These are one of the best parts of October.


Ashely's Pumpkin Cookies
  • 1/2 c. shortening
  • 1 1/2 c. sugar
  • 1 egg
  • 1 c. canned pumpkin
  • 2 1/2 c. flour
  • 1 tsp baking powder
  • 1 tsp baking soda
  • 1/2 tsp salt
  • 1/2 tsp cinnamon
  • 1/2 tsp nutmeg
Preheat the oven to 350 degrees. Cream together the shortening and sugar. Add the egg and mix. Add the pumpkin and mix. In a separate bowl, mix together the dry ingredients (flour, baking powder, baking soda, salt, cinnamon, nutmeg). Add the dry ingredients to the wet mixture and mix. Dough will be thick.

Drop by teaspoons onto greased cookie sheet. Bake for 12-15 minutes or until the edges are slightly browned. Frost when cool.

Paula's Cream Cheese Frosting
  • 1 lb (16 oz.) cream cheese, softened
  • 2 sticks butter, softened
  • 1 tsp vanilla extract
  • 4 c. confectioners sugar
Beat together the cream cheese, butter, and vanilla. Slowly add the confectioners sugar on low speed and beat until incorporated. Increase speed to high and mix until light and fluffy.

Wednesday, September 29, 2010

Gourmet Pizza Time!

When you have a bunch of veggies you need to get rid of, a pizza is always a great idea. I am not a huge fan of red pizza sauce, so I prefer a white or pesto pizza. We got another bag of arugula this week from CSA and I'm tired of making Pecorino and Pepper Pasta. I searched on Tastespotting for some ideas for arugula and I decided to put it on a pizza. It has such a great flavor and brings in a nice peppery bite. I thought it would pair well with salty prosciutto and sweet caramelized onions. This pizza was, to say the least, beautiful. The bright green arugula, pink prosciutto, and white shaved parmesan made the pizza look great. The only downside was that the pesto made the pizza very oily. I bought the refrigerated small plastic tub from Trader Joe's. It's a great pesto sauce, but if I did it again, I would either use less or try to squeeze out some of the oil before spreading it on the dough. This pizza turned out wonderful and puts any gourmet pizza from Sauce to shame.


Arugula, Prosciutto, Caramelized Onions, and Shaved Parmesan Pizza

  • Pre-baked pizza dough (I like to use the refrigerated bags from Trader Joe's)
  • 2 Tbsp Extra Virgin Olive Oil
  • 1 onion, sliced
  • 1 tsp sea salt
  • 1 tsp sugar
  • Pesto sauce (Store bought or make your own)
  • Fresh mozzarella cheese, sliced
  • 1 package of prosciutto (about 4 oz), sliced into strips
  • 1 1/2 c. fresh arugula, stems removed and coarsely ripped
  • Shaved parmesan cheese
To prepare the caramelized onions, heat the olive oil in a small saute pan. Add the sliced onions, salt, and sugar and stir until the onions are soft and have a nice brown, caramel color. This will take about 20-30 minutes. 

Preheat the oven according to the pizza dough packaging, I set my oven to 450 degrees.

On the pre-baked pizza dough, spread the pesto sauce and leave a 1/2 inch crust. Place one layer of the sliced mozzarella on the pizza and sprinkle the caramelized onions on top. Lay about half of the prosciutto on the pizza and put in the oven for 10 minutes or until the crust is finished baking.

Remove from the oven and turn the oven off. Cover the pizza with the arugula. Take the remaining prosciutto strips and twirl them into mounds and place on the pizza. Sprinkle the shaved parmesan on top. 

Place the pizza back in the turned off oven for one minute to allow the arugula to to wilt a bit. Remove from the oven and sprinkle with a little more of the shaved parmesan. 

Cut, serve, and enjoy!

Tuesday, September 28, 2010

The OTHER course.

If you know anything about Starving Medical Student A, you know she values desserts more than real food. While she made her highlighted dessert, I, Starving Medical Student B, slaved away on 2 dishes....yes 2 DISHES. First I started making Thai Basil Chicken. At this point the taskmaster cracked the whip and had me make babaghanoush.

This recipe is basically a hodge podge of a bunch of recipes I found on the internet. It consists of roasted/grilled eggplant, tahini, cumin, turmeric, lemon juice, cayenne pepper, salt, raw garlic, olive oil, and parsley. 

This is my basic recipe for Baba Ghanoush:
  • 3 small japanese eggplants
  • 1 pinch of salt (a real pinch, not a sad pathetic one)
  • 1/4 cup of tahini (maybe slightly less)
  • 3-4 tbsp of lemon juice
  • 1 large clove of garlic
  • 3 tbsp of olive oil
  • 1/8 cup of finely parsley (no stems!)
  • 1 tbsp of cayenne pepper
  • 1 tbsp of cumin (this is just a starting point. Season to taste)
  • 1 tbsp of turmeric (this is just a starting point. Season to taste)


Turn on your grill. Don't have one? Turn on your convection oven to BROIL. Very lightly coat your eggplant with olive oil and broil it for 20 minutes (rotate it every 10 minutes). Once you can stick a fork into the eggplant without any resistance...They're done! Let them cool. Meaning, they should be room temperature by the next step.

Once they are cool, peel the skin off and throw the meat (insides) of the eggplant into a food processor or blender. Note: blenders don't work as well as food processors. I learned this tonight when I had to retire my blender after it fell apart from the gears spinning too much. RIP Black and Decker Blender.

Now add everything else. Remember no stems in the parsley unless you really want an earthy flavor. When I say earthy I mean, a fresh mowed lawn flavor. 

Turn on your food processor and you're done! If the babaganoosh turns yellow, do not freak out. That's probably the turmeric turning it that color.

Final step: Enjoy with your favorite trademark sea salt pita chips from Trader Joes in the aisle in front of the free sample bar. 

Now here's the picture:

Sweet n' Spicy

We have getting mass amounts of green chiles from the CSA. I thought I had made just about everything possible: green chile cheeseburgers, green chile mac n' cheese, green chile corn chowder, green chile tomatillo salsa, green chile sandwiches, green chile beef stew... I have avoided tamales because I don't think I'm talented enough and I don't know how I feel about green chile corn bread. Then a fellow med student (forked) posted a great link on my wall--Green Chile and Apple Hand Pies. This sounded just up my alley. Combine the green chiles with something sweet and throw it all into a crusty puff pastry, amazing. 


These were actually incredibly easy to make. You basically mix all the ingredients together and throw it into a pastry and bake. I used a frozen puff pastry from Trader Joe's and it came out great. This is also wonderful with a scoop of vanilla ice, but really, what isn't great with ice cream?


Green Chile and Apple Hand Pies
from Bless her heart

  • 4 sheets of puff pastry (two frozen packages from Trader Joe's), thawed according to manufacturers instructions
  • 3 cups of peeled gala apples (about 6 small apples), cored and diced into 1/2" pieces
  • 1 tbsp fresh lemon juice
  • 1 cup roasted and peeled green chiles (6 chiles), diced.  
  • 1/4 cup of sugar
  • 1/4 tsp ground cinnamon
  • 1 tsp cornstarch
  • 1/4 tsp salt
  • flour for dusting the workspace
  • 1 egg for egg wash

Preheat the oven to 375 degrees.
Mix the lemon juice with the apples to keep them from browning.  Stir in the diced green chiles.  In a small bowl, mix the sugar, cinnamon, cornstarch and salt. Thoroughly mix these dry ingredients into the apple mixture.   Set aside.  In a small bowl beat the egg for the eggwash.  Lightly flour a work surface for cutting out the puff pastry circles. Cut each sheet into 4 equal squares and brush with the egg wash. Fill in half of the square with the apple filling.  Each pie will need 2 tablespoons of filling. Fold in half, tucking the filling inside as you go along and pinch closed, or seal with the tines of a fork. Cut a 1" slit in the top for a vent.  Brush the top with the egg wash.  Place on a parchment or silicone baking mat on a baking sheet.  Repeat with remaining hand pies. Bake for 25 minutes or until golden brown.

Monday, September 20, 2010

Spicy Soup and Pepper Pasta

We had lots of great goodies in our CSA share this week. A great way to use up veggies is a nice chowder. You can throw virtually anything in this soup and it will be delicious. I made a corn chowder with potatoes, onions, green chiles, zucchini, and summer squash. It was delicious, a little spicy, but still great. The sweet corn and the creamy soup was just perfect with the spicy roasted chiles. The potatoes and squash make the soup really hearty and filling. Just perfect.

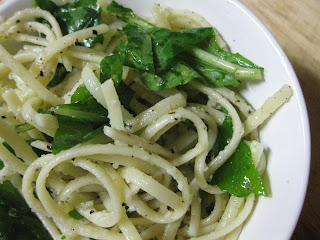
I also decided to make one of my absolute favorite pastas. I first had this when I went to Mario Batali's restaurant in Las Vegas called Enoceta San Marco. It's in the Venetian Hotel right on the side of the canal in the courtyard. This dish is so simple yet so delicious. Creamy pecorino romano and the bite of fresh ground pepper mix so well together. Paired with fresh peppery arugula, it cuts the creamy and adds a nice crunch. This is a great pasta dish. The key to this dish is the finely grate the cheese and add it very very slowly. If you add it too fast, it will melt and clump into balls rather than slowly melt and create a creamy sauce. This is best if you have a buddy in the kitchen who can constantly stir the pasta while you slowly sprinkle in the cheese. JC is great at doing this!

These dishes paired surprisingly well together. The pasta was rich and creamy and the soup was nice and hearty with a little bite. You could easily serve either solo as an entree. These are great and took almost no time to prepare.

Green Chile Corn Chowder
adapted from Corn Chowder by Tyler Florence
  • 2 tablespoons butter
  • 1 tablespoon extra-virgin olive oil
  • 1 onion, diced
  • 2 garlic cloves, minced
  • 1 tablespoon Herbs de Provence (or any other herb mix)
  • 6 cups canned chicken stock
  • 2 cups heavy cream
  • 2 cups red la soda potatoes, peeled and diced
  • 1 bag frozen sweet corn
  • 6 roasted green chiles, seeded and chopped
  • 3 squash (zucchini or summer squash), halved and sliced
  • Salt and freshly ground black pepper
Heat the butter and 1 tablespoon olive oil in a soup pot over medium heat. Add the onion, garlic, and herbs and cook until the vegetables are good and soft, 8 to 10 minutes. Pour in the chicken stock and bring to a boil. Add the cream and the potatoes, bring to a boil and boil hard for about 7 minutes, until the potatoes break down (this will help to thicken the soup and give it a good texture). Add the corn kernels, chiles, and squash to the soup. Season with salt and pepper and simmer until the corn is soft. Ladle the soup into bowls and serve.


Pecorino and Pepper Pasta
from Linguine with Butter, Pecorino, Arugula, and Black Pepper by Giada De Laurentiis
  • Salt
  • 1 pound linguine
  • 1/4 cup (1/2 stick) butter, room temperature
  • 1 1/4 cups very finely grated Pecorino Romano
  • 1 1/2 teaspoons freshly ground black pepper
  • 1 1/2 cups coarsely chopped arugula
Bring a large pot of salted water to a boil over high heat. Add the linguine and cook until it is al dente, stirring frequently, about 8 minutes. Drain, reserving 1 cup of the cooking liquid.

Immediately toss the hot pasta in a large bowl with the butter to coat. While tossing the linguine, gradually sprinkle the cheese, pepper, and enough of the reserved cooking liquid evenly over the linguine to moisten. Add the arugula and toss to combine. Season the pasta, to taste, with salt. Serve with extra fresh arugula tossed on top of the pasta.

Tuesday, September 14, 2010

Are you a Green Goddess?

We have been getting a plethora of carrots from the CSA recently. We used a bunch of them for the spaghetti sauce and I made some Carrot Fennel Pasta and then a dipping sauce for raw carrot sticks. I am not a huge fan of raw carrots, unless they are in some sort of creamy dressing like ranch or blue cheese. I had some left over tarragon from the gazpacho and the first thing that came to mind was that delicious tarragon dressing they have at Grill. If you live in Tucson and don't know about Grill, you are out of the loop, and also lame. Grill is downtown right next to Wig-O-Rama and is open 24/7. So if you're craving the best tater tots in town, you can get them Wednesday at 5pm or after a long Saturday night at Congress, you're in luck. One of my favorite dishes the Freaking Great Tortellini. Seriously, that's what it's called on the menu. It's fresh spinach, chives, and grilled chicken in a creamy garlic and parmesan cheese sauce. And like I said before, they have the best tater tots in town--scratch that, the world. No questions, hands down the best.

So, Grill has this freaking awesome tarragon dressing. It's great on salads and also great to dip tater tots in. I have extra tarragon, I should make tarragon dressing. I did some searching on tastespotting and found the history of Green Goddess Dressing. According to The New York Times, "The Green Goddess salad was made famous at the Palace Hotel in San Francisco in 1923 as a tribute to George Arliss, the star of the play The Green Goddess." It has a foundation of anchovies, chives, scallions, and tarragon. Do not be afraid of the anchovies. Yes, they are fishy, but that is what this dressing needs. It's like a great caesar salad dressing, it needs to have the slight back taste of anchovies. This dressing is delish. It would go great on simple romaine and definitely perfect for dipping carrots. One thing, do not overdose on the garlic. As always, I put in extra garlic and this is definitely not the place. The raw garlic is very intense and makes the dressing actually a little spicy, but not in a good way. Start with one clove and slowly add more until you are happy. You can always add more, you can't take some away. Super yum.


Green Goddess Dressing
adapted from EAT.DRINK.THINK.
  • 1 cup mayonnaise
  • 3 flat oil packed anchovy fillets, minced
  • 1 teaspoon oil from anchovy jar or tin
  • 2 cloves garlic, minced
  • 1 scallion chopped
  • 2 tablespoons chopped flat leaf parsley
  • 2 tablespoons chopped chives
  • 3 tablespoons chopped tarragon
  • 1 tablespoon wine vinegar
  • salt and freshly ground pepper
Combine all ingredients except salt and pepper in food processor and purée until smooth. Season with salt and pepper.

Sunday, September 12, 2010

Tomato Soup and Tomato Sauce

This upcoming week is going to be super busy, so I wanted to try and make a dinner that I could take for lunch the next few days. *Plug for the Integrative Medicine Club: Lunch Talk (El Guero!!) with Dr. Carlos Gonzales on Traditional Indian Medicine Concepts on Healing. Be there!* I though, what better leftovers than spaghetti and meatballs? JC makes an amazing marinara sauce that is one of my favorite foods in the entire world. It is also great because you can hide veggies in it and it still tastes delicious-carrots, celery, zucchini, onion... A great trick for picky kids who don't like their veggies (right Ash?). This is one of the few dishes that I could eat three times a day for a week straight. Luckily, we always make enough sauce to last us almost that long. The sauce is so creamy (though it lacks any sort of fatty cream) with a little bit of spice too. Yum.

I also decided to make some meatballs with the spaghetti. I found this recipe on food network and they were so yummy. Three different types of meat, breadcrumbs, cheese, eggs, herbs, and spices, that's it! The secret to creating these cute little guys is that you cook them in a mini muffin tin. Best idea ever. They keep their shape and stay separated from each other. Alton, you're a genius. The recipe made about 3 dozen small meatballs, so I'll probably freeze away some of them (you could also freeze the uncooked meat instead).

Along with the spaghetti and meatball main dish, I also whipped up some gazpacho. I took this from a fellow med student's blog who took it from a Moosewood recipe. We actually both had this at a Global Health class prepared by the famous Dr. Pust. Gazpacho isn't my favorite soup, JC loves it, but this soup is delicious. It's nice and chunky with every kind of veggie under the sun. Next time, I will probably add a little more tomato juice, it was a little too chunky. I think JC is going to puree some of it to make it smoother. I think it would also be served great with some avocado pieces on top. I am a sucker for spices, so I added a lot more spices than the original recipe called for. And, of course, also A LOT of extra Tabasco.

ADDENDUM: I need to add that while JC and I were prepping dinner, we ended up putting too many veggie scraps in the garbage disposal. I had no idea that you could actually clog a garbage disposal, but we managed to do it. With a sink full of water and bits of vegetables everywhere, JC dove under the sink to take about the plumbing. During this time, he also managed to turn on the water without a bucket under the tubes, thus creating a waterworks show under the sink. An hour later, wet, messy, and tired, JC managed to fix the sink (hooray!) and everything was cleaned up. During this time, we both managed to finish chopping all the veggies for the soup, boil down the spaghetti sauce, and mix the meatballs. All of this could have been avoided if we had a compost pile in the backyard. One of the many things I would love to have once I own my "real home." Compost pile, gated garden/greenhouse, chickens...just to name a few.


Gazpacho
adapted from Forked
  • 6 cups cold tomato juice
  • 1 small, well minced onion
  • 2 cups freshly diced tomatoes
  • 1 cup minced green pepper
  • 1 diced cucumber
  • 1 bunch copped radish
  • 4-5 stocks chopped celery
  • 3 scallions/green onions chopped
  • juice of one lemon
  • 1/4 cup chopped parsley
  • 2 tbs. wine vinegar
  • 2 tsp. dried basil
  • 2 tsp. chopped fresh tarragon
  • 2 tsp. of cumin
  • 1 tsp. honey
  • 3 cloves crushed garlic
  • 2 tsp. olive oil
  • salt & pepper to taste
  • Tabasco to taste
Combine all ingredients and chill for at least 2 hours.


Marinara Sauce
adapted from Giada De Laurentiis
  • 1/4 cup extra-virgin olive oil
  • 1 small onion, finely chopped
  • 4 garlic clove, finely chopped
  • 4 celery stalk, finely chopped
  • 4 carrot 
  • 1 teaspoon sea salt
  • 1 1/2 teaspoon freshly ground black pepper
  • 2 (28-ounce) cans crushed tomatoes
  • 4 dried bay leaves
In a large pot, heat the oil over a medium-high flame. Add the onions and garlic and saute until the onions are translucent, about 10 minutes. Add the celery, carrots, and 1/2 teaspoon each of salt and pepper. Saute until all the vegetables are soft, about 10 minutes. Add the tomatoes and bay leaves, and simmer uncovered over low heat until the sauce thickens, about 1 hour. Remove and discard the bay leaves. Season the sauce with more salt and pepper, to taste. Pour sauce into a blender and blend until smooth.


Meatballs
from Alton Brown 
  • 1/2 pound ground pork
  • 1/2 pound ground lamb
  • 1/2 pound ground beef
  • 5 ounce frozen spinach, thawed and drained thoroughly
  • 1/2 cup finely grated Parmesan
  • 1 whole egg
  • 1 1/2 teaspoons dried basil
  • 1 1/2 teaspoons dried parsley
  • 1 teaspoon garlic powder
  • 1 teaspoon kosher salt
  • 1/2 teaspoon red pepper flakes
  • 1/2 cup bread crumbs, divided
Preheat the oven to 400 degrees F.

In a large mixing bowl, combine the pork, lamb, ground round, spinach, cheese, egg, basil, parsley, garlic powder, salt, red pepper flakes, and 1/4 cup of the bread crumbs. Using your hands, mix all ingredients until well incorporated. Use immediately or place in refrigerator for up to 24 hours.

Place the remaining 1/4 cup of bread crumbs into a small bowl. Using a scale, weigh meatballs into 1.5-ounce portions and place on a sheet pan. Using your hands, shape the meatballs into rounds, roll in the bread crumbs and place the meatballs in individual, miniature muffin tin cups. Bake for 20 minutes or until golden and cooked through.

Wednesday, September 8, 2010

Going Green

This dish was actually from last night, but I thought it wasn't worthy of posting. I added WAY too much breadcrumbs and it ended up being a dry mound of pasta. I took it out of the refrigerator for dinner tonight, scrapped off about 1 1/2 cups of breadcrumbs, reheated it, and it was just great. Dish was saved!

We have been getting a lot of green chilies from the CSA recently. The first time I made some super delicious Green Chile Cheeseburgers (I've included the recipe at the end of this post). These were so moist with the flavor of roasted green chiles both in the patty and as a relish on top. So so so so so good. We grilled over at a friend's house and she made a great warm kale salad with golden raisins (I don't have the recipe for that, you'll have to get it from A). Kale is like a super veggie. It is incredibly high in vitamins and it tastes delicious. To top the dinner off, A and I made a pistachio bark--basically melted dark chocolate chips mixed with pistachio pieces and then chilled in the freezer. Great night with some great friends.

As for dinner from last night. I had more green chilies so I thought I would try a recipe for Green Chile Mac n' Cheese. The recipe is actually based off of a dish from Roaring Fork in Scottsdale. I have never been to the restaurant, but it's definitely on my list of places to go now. Like I said, the recipe called for way too much breadcrumbs, so I cut back a lot. Other than that, I stuck pretty close to the recipe. I added extra garlic (obviously) and altered the cheese a bit, but even with the minor changes, it turned out creamy and delicious. I roasted the chiles under the broilers, but it could easily be done over a gas stove or on the grill. This was a great dish, but I would recommend making it for a large group of people. We have leftovers to last us a lifetime!


Green Chile Mac n' Cheese
adapted from Luna Cafe

Pasta

1 pound, short, dried, tubular pasta, such as mini penne, garganelli, maccheroni, mostaccioli, tortiglione, or ziti (about 2¼ pounds cooked)

2 teaspoons sea salt


Breadcrumb Topping

3 tablespoons unsalted butter, melted

1 cup dried white bread crumbs, coarsely crumbled

2 clove garlic, pressed or minced

sea salt, to taste


Cheeses
9 ounces Sharp cheddar, grated
9 ounces Monterrey Jack, grated
1½ ounces (about 3/4 cup) finely grated Parmesan


Cream Sauce
2 tablespoons unsalted butter
1 cup minced yellow onion (4 ounces or about ½ large onion)

¼ cup all-purpose flour

3 cups Green Chile Crema (see recipe below)

1/2 cup sweet corn kernels

sea salt, to taste

  1. Coat an 8- to 10-cup capacity, ovenproof casserole with vegetable spray or a dab of butter; or coat six 1½-cup capacity stoneware ramekins or iron skillets. Reserve.
  2. To prepare the pasta, bring a large pot of water to a rapid boil, add 2 teaspoons of salt, return to a boil, and add the pasta. Cook until still VERY al dente. Do not cook until fully tender.
  3. Remove the pasta pot from the stove and carefully pour the water and pasta into a large colander to drain. Run cold water over the pasta to cool it to room temperature. Add pasta to a large mixing bowl.
  4. Toss the pasta in the bowl with all of the cheeses and reserve.
  5. To make the breadcrumb topping, in a small mixing bowl, combine the melted butter, bread crumbs, and garlic. Season to taste with sea salt. Reserve.
  6. To make the cream sauce, in a medium saucepan, melt the butter, add the onions, and slowly cook until onions are just beginning to soften.
  7. Add the peppers and corn, and stir to coat with butter.
  8. Stir in the flour and cook without browning for two minutes.
  9. Slowly pour in the Green Chile Crema and whisk constantly while bring the sauce to a simmer. Simmer, whisking continuously, for 2 minutes.
  10. Season to taste with sea salt.
  11. To finish the dish, pour the sauce over the pasta and cheeses in the bowl. With a large spatula, fold to combine.
  12. Spoon into the prepared casserole, mounding slightly at the center.
  13. Sprinkle on the breadcrumb topping.
  14. Bake at 350º for 30-40 minutes for the single casserole or 10-15 minutes for individual ramekins, until heated through and just bubbling. (High heat or excessively long cooking time may curdle the cheeses.)
  15. Broil for a minute or two to finish browning the top  
Green Chile Crema
 Makes about 3 cups.
  • 2 cups heavy cream
  • 6 green chiles or 2 cups canned green chiles
  • 1 tomatillo, papery skin removed, sticky coating rinsed off, stemmed, chopped
  • 2 tablespoons minced garlic
  • 3 green onions, green parts only, chopped
  • sea salt, to taste
  1. To roast the green chiles, set the broiler to high. Brush chiles with vegetable oil and place on a baking sheet. Place in oven for about 5 minutes per side or until the skin is blackened. Place hot chiles in a ziplock bag and sweat for about 5 minutes. Remove from bag and peel away skin. Remove stems and seeds. 
  2. In a medium saucepan, heat the cream and add the chiles, tomatillo, and garlic. Simmer gently for 2-4 minutes and then remove from the heat. Let cool.
  3. Using a blender, pour the cream and chile mixture into the container and liquefy.
  4. Add the green onion and liquefy.
  5. Season with salt to taste.


Green Chile Cheeseburgers
adapted from Perrys' Plate
  • 3 green chiles, stemmed, seeded, and halved lengthwise
  • 3 jalapeno chiles, stemmed, seeded, and halved lengthwise
  • 1 medium onion, sliced into 1/2-inch thick rounds
  • 1 garlic clove, minced
  • salt and pepper
  • 1 1/2 lbs lean ground beef
  • 4-6 slices of cheese (Monterey jack, pepper jack, or cheddar recommended)
Preheat grill or stove-top grill pan to high heat. Oil the cooking grate if necessary. Lay the chiles and onion slices on the grill and cook until the vegetables are lightly charred and tender, about 4-5 minutes per side. (Covering them while they cook helps them to soften faster.) Transfer onions and chiles to a bowl and cover with plastic wrap or a kitchen towel. Let them sit for a few minutes to cool. (And to steam -- it makes the peel come off the chiles easier.) Remove the skins from the chiles and discard; separate the onion rounds into rings.

Transfer the chiles, onions, garlic, to a food processor and pulse until coarsely chopped, about 10 pulses. Remove all but 1/4 c. of chile mixture to a bowl and set aside. Season with salt and pepper to taste. Process remaining mixture until smooth.

In a large bowl combine the beef, pureed chile mixture, 1/2 tsp salt, and 1/4 tsp pepper. Knead gently until well incorporated. Shape into patties. (Either 4 big and thick or 6 small patties.) Press your thumb gently into the middle of each patty to create a shallow divot. (This keeps the burgers from getting rounded tops while grilling.)

Grill the burgers, covered, until well-browned on the first side, 3-5 minutes. Flip the burgers, top each with a spoonful of the chopped chile mixture and a slice of cheese. Continue to grill, covered, until the cheese is melted and the burgers are cooked through, about 4-5 more minutes.

Serve on toasted buns with desired garnishes.

Birthdays = Cupcakes.... obviously.

Before I start about food, I have found a nifty feature on this blog called Stats. It actually tracks what countries my blog is being viewed in, what browsers people are using, what operating system people are using to view it, and how many hits I get a day/week/month/year. It surprises me everyday how many people actually read this and come up to me and talk about it. Thank you for endorsing my little hobby. It also surprises me that I have readers in Turkey, India, Taiwan, China, Ecuador, Austria, and even Latvia. Yes, Latvia. Who knew? I don't even know anyone who lives in Latvia. So to my reader in Latvia, thanks for reading and I hope you're enjoying the food. Now, on to the good stuff.

This past holiday weekend brought JC and I up to Phoenix for a friend's birthday. And what kind of birthday would it be without dessert--specifically cupcakes. When I hear birthday, my ears perk up and the gears in my brain automatically start turning to think about what I can bake, craft, or decorate. This friend does not like chocolate which made my choices a little more narrow than usual. Fortunately, I'm not a huge fan of chocolate myself (gasp!) so I don't normally use it. I did some browsing and was debating between a carrot cake a la Thomas Keller, pistachio cupcakes, or matcha cupcakes. In the end, the latter won. They were a vibrant green color so characteristic of matcha. And they had a wonderful strawberry buttercream frosting that I actually piped myself. Granted, it was with a ziplock bag, but they still looked gorgeous. And to top it off, they had a surprise vanilla custard filling. They ended up just divine. Not too sweet with a hint of the unmistakable flavor of matcha green tea. They were a hit at the house and a perfect snack for the boys while they played Starcraft.

The original recipe only made a dozen cupcakes, so I doubled it and it worked just fine. For the frosting, it is very helpful is you have a kitchenaid mixer. I don't so I had to do it all with a 20+ year old hand mixer. It was tough and made me realize I should probably do more P90X arms. The original recipe made a strawberry custard for filling. Somehow when I printed out the recipe, the whole section about adding strawberries to the custard got deleted, so I just made a vanilla custard which turned out to be great (probably better). Adjust this how you would like. The frosting is so versatile, you could keep it as plain vanilla or add virtually any other mix in--in this case it was strawberry preserves. Delicious no matter what.


Matcha Green Tea Cupcakes with Strawberry Buttercream Frosting
adapted from Une-Deux Senses

Makes 24 cupcakes

For the cake:
1 1/2 cup + 4 tbsn. cake flour
1 cup + 4 tbsn. all purpose flour
2 cup sugar
3 tsp. baking powder
1 tsp. salt
2 tbsn. matcha powder
1 cup unsalted butter, softened, cut into 1-inch cubes
4 large eggs
1 cup whole milk
1 tsp. vanilla

For the custard:
1 small box of instant vanilla pudding
1 cup whole milk
3/4 cup heavy cream
1 tsp. vanilla extract

For the buttercream frosting:
4 large egg whites
1 cup sugar
1 tsp. vanilla
3 sticks of butter, cut into 24 pieces
Strawberry puree or preserves

Preheat the oven to 325 F. Line a cupcake tin with liners and set aside. In the bowl of an electric mixer fitted with the paddle attachment, combine flours, sugar, baking powder, salt and matcha powder. Mix on low speed until combined. Add the butter, mixing until the cubes of butter are peanut sized or a little smaller. In a large glass measuring cup, whisk together the eggs, milk and vanilla. With the mixer on medium speed, add the wet ingredients in 3 parts, scraping down the sides of the bowl before each addition; beat until ingredients are incorporated but do not overbeat. Divide the batter evenly among liners, filling about 2/3 full. Bake until an inserted toothpick comes out clean, 17 - 20 minutes. Transfer to a wire rack and let cool completely.

To make the custard, whip the first four ingredients together until it is well combined and begins to thicken, about 3 - 5 minutes. Place in refrigerator to let chill and thicken some more until ready to use. 

To make the frosting, put the egg whites and sugar into the bowl of an electric mixer. Place the bowl over a pot of boiling water making sure the bottom does not actually touch the water. Stir the egg whites until the sugar is dissolved. Remove from the heat and place into the mixer stand (or use a hand mixer). Beat until it becomes white and doubles in size. Add the vanilla on low speed, then add the butter, one piece at a time, making sure it is well mixed after each addition. Do not worry if it looks curdled, it will take some time for it to come together. Continue beating for 5 - 10 minutes until everything comes together. Add the strawberry puree or preserves until desired berry taste. 

Once cupcakes are cooled, use a paring knife to cut out a hole in the top of each. Fill each hole with the chilled custard. Cover each cupcake with the buttercream frosting. Enjoy!

LinkWithin

Related Posts with Thumbnails