Sunday, December 26, 2010

Magic Fish

I really do love creole food. It is full of so much flavor and soul. We were at the store and they had some beautiful catfish filets. Catfish is a very flavorful fish and really easy to cook. We usually Chef Paul Prudhomme's Blackened Redfish Magic Seasoning on catfish. It has a wonderful taste and a little bit of a kick. I thought we had some in the cabinet, but after searching, I realized we were all out. This created a great opportunity to experiment. I pulled out a mix of spices, stirred them together, and created a great catfish rub.  This is probably one of the easiest dishes you could possibly think of and it tastes really really great.


Blackened Catfish
  • 2 (6-oz.) filets of catfish
  • 1/2 Tbsp paprika
  • 1/2 Tbsp cumin
  • 1/2 Tbsp Gebhardt Chili Powder
  • 2 tsp dried thyme
  • 2 tsp garlic powder
  • 2 tsp (plus more or less) cayenne pepper
  • 1 tsp sea salt
  • 1 tsp fresh cracked black pepper
  • 2 Tbsp vegetable oil
  • 1 Tbsp butter
  • 2 lemon wedges
Mix all of the spices in a bowl. Dredge catfish filets in seasoning. Heat a pan and when it is hot add the oil. When the oil starts to smoke, add the catfish and cover with an oil splatter screen. Cook for 3 minutes on each side. Serve with a pat of butter on top and lemon wedges on the side. 

Sunday, December 12, 2010

Holiday Cheer


It's that time of the year. I love Christmas time, we are off of school and there are so many great crafts and recipes. It's the time for gift giving, so I have an excuse to get crafty and spend some time in the kitchen making holiday boxes for loved ones. I've recently gotten into stamps and am slowly acquiring a small collection. There are so many wonderful holiday stamps and great for creating gift tags and cards. One of my favorite holiday crafts are candy cane reindeer. I remember having these hung on our Christmas tree since I was a little kid. They are so simple and so cute. They are simply a candy cane, red pom pom, google eyes, brown pipe cleaner, and tacky glue. So easy and so cute.

This year I decided to try to make a peppermint bark. It is one of my favorite holiday treats. I really love peppermint flavor and when it is mixed with chocolate, pure yum. Usually it's just a layer of dark/milk chocolate, a layer of white chocolate, and crushed peppermint sprinkled on top. It gets messy because you need to melt the chocolate in a double boiler and it takes a while because you need to cool each layer. I decided to spice things up a bit and make a fancier peppermint bark. I found a recipe from Bon Appetit for peppermint bark with a shortbread cookie bottom. It sounded perfect. The buttery cookie gives a nice touch to contrast the sweet chocolate. It also creates another pretty layer in your treat. I also recently discovered peppermint Hershey's kisses. They are delicious red and white swirls of white chocolate, peppermint flavor, and crunchy sprinkles. Rather than the typical crushed candy canes, I decided to chop up these yummy morsels and sprinkle them on top. They end up melting and creating a really pretty red and while pattern on top. Then I drizzled some extra white chocolate on top and a toss of red sprinkles, and voila, spruced up peppermint bark. This recipe is great as a gift, put them in a pretty tin or a holiday box and pass them on to all of your favorite people.

Peppermint Bark Cookies 
adapted from Bon Appetit
  • Nonstick vegetable spray
  • 2 cups all purpose flour
  • 1/4 tsp salt
  • 1 cup unsalted butter, room temperature
  • 1 cup sugar
  • 1 tsp vanilla extract
  • 1 large egg yold
  • 12 oz. bag bittersweet chocolate chips
  • 1 bag peppermint Hershey's kisses, chopped
  • 1 oz. white chocolate, melted
Preheat oven to 350°F. Spray 13 x 9 x 2-inch metal baking pan with nonstick spray. Line bottom of pan with long strip of 9-inch-wide parchment paper, leaving overhang on both short sides of pan. Whisk flour and salt in medium bowl. Using electric mixer, beat butter in large bowl until creamy, about 2 minutes. Gradually beat in sugar. Continue beating until mixture is light and fluffy, stopping occasionally to scrape down sides of bowl, about 3 minutes. Beat in vanilla, then egg yolk. Gradually add flour mixture, beating on low speed just to blend.

Drop dough by tablespoonfuls into prepared baking pan, spacing evenly. Using moistened fingertips, press dough to form even layer over bottom of pan. Pierce dough all over with fork.

Bake cookie base until light golden brown and slightly puffed and edges begin to come away from sides of pan, about 30 minutes. Place pan on rack; immediately sprinkle bittersweet chocolate over. Let stand until chocolate softens, about 3 minutes. Using small offset spatula, spread bittersweet chocolate over top of cookie in thin even layer. Immediately sprinkle chopped peppermint candies over.

Stir white chocolate in medium metal bowl set over saucepan of simmering water until melted and smooth. Remove from over water. Using fork, drizzle white chocolate all over cookies. Chill until white chocolate is set, about 30 minutes.

Using paper overhang as aid, lift cookie from pan and transfer to work surface. Using large knife, cut cookie into irregular pieces.

DO AHEAD: Can be made 1 week ahead. Store in refrigerator in airtight containers between layers of waxed paper or parchment paper.

Friday, December 3, 2010

Squash and Custard

We got an acorn squash in our CSA this week. I don't have much experience with this veggie, so I did a little searching and found a great recipe on Saveur. Apparently this is a traditional recipe from Thailand called sangkaya. It normally is in a kabocha squash, but I adapted it to an acorn squash. This is an absolutely amazing dessert. It sounds a little fishy: coconut custard cooked in a squash. But it is incredibly delicious. Really really delicious. The coconut custard is just sweet enough to complement the squash perfectly.

It's actually pretty simple to make too. Looking at the recipe, it looks a bit daunting, especially since it is from the all-amazing Saveur. But in retrospect, it was pretty simple. I started making it before cooking dinner and it was done right as we finished eating dinner.

Part of the recipe calls for the use of a double boiler. This is a technique used to cook delicate sauces in which you need to control the temperature. Here is a great description with the physics behind it from our good friends at Wikipedia. I used a pot with a little boiling water at the bottom and place a metal bowl with handles in it. The handles sat on the lip of the pot, so the bowl wasn't touching the water but still getting hot. 

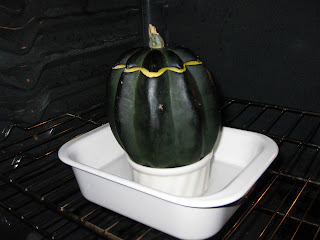
There was one part of the recipe that was a bit confusing. It was about how to set up the rack in the oven. I didn't really get it. It said put the squash in an 8x8 baking dish and pour 1 cup of boiling water into the dish. I don't really know what the hot water is supposed to do. Since my acorn squash didn't have a flat bottom and wouldn't stand up by itself, I placed it in a ramekin and then placed that into a dish. I poured hot water into both the dish and the ramekin. Again, I have no idea what the water is for, but my custard turned out great, so maybe it was important in the end. Here is my crazy oven setup:


I used palm sugar for this which is a sugar derived from coconut, but you could use brown sugar if you don't have palm sugar on hand. Also, you need to get coconut cream (not coconut milk). I found copious amounts at 17th Street Market, about 5 different brands. This is super super delicious (got a 10 from JC), so try this if you have a winter squash (acorn, kabocha, pumpkin) on hand.


Coconut Squash Custard
from Saveur
  • 1  1 1⁄2–2-lb. kabocha squash
  • 1⁄2 cup canned coconut cream
  • 1⁄2 cup semimoist Thai palm sugar
  • 1⁄2 tsp. fine salt
  • 6 egg yolks
1. Using a long, sharp knife, cut off the top of the squash, about 1" from the stem end. Discard top. Using a spoon, scoop out and discard the seeds and the fibers to make a hollow cavity. Set aside.

2. In a 1-qt. saucepan, whisk together the coconut cream and 1⁄4 cup of the palm sugar. Bring to a simmer over medium heat, while whisking occasionally; remove from heat and let sit for 10 minutes to cool slightly. In a medium bowl, whisk together the remaining palm sugar with the salt and egg yolks until yolks are smooth and pale yellow. While whisking the yolks, slowly drizzle in the hot coconut cream mixture. Transfer mixture to top of a double boiler set over simmering water and cook, stirring constantly with a wooden spoon, until mixture thickens and coats the back of the spoon, about 4 minutes.

3. Heat oven to 325°. Pour custard into the reserved squash and set on rack in the bottom of an 8" x 8" baking dish. Pour 1 cup boiling water into dish. Bake until a knife inserted into center of custard comes out clean, about 2 hours. Let cool; slice into 6 wedges. Serve at room temperature or chilled.

Wednesday, December 1, 2010

Wo ai jiaozi

This is a spin off of the wontons I posted about last week. This is the potsticker/gyoza/jiaozi version. I actually prefer the pan-fried dumplings better than soup--but that's kind of a given, since fried always makes everything better. These use the exact same filling as the wontons, but you need to used the round thick gyoza skins rather than square thin wonton skins. They hold up much better during the cooking process and are thick enough to fry just perfectly. Ideally, we normally make our own dough. It's just a mix of flour and water. I was lazy and was not in the mood to mess with that tonight, so we just used good quality (emphasis on GOOD QUALITY) store bought skins.

There is also an art to pleating your dumplings. According to JC, if you don't pleat them, they're not real potstickers. This is a different fold than if you are doing soup dumplings. I've tried to find a site that explains how we do ours, and this is the best I could do with Appetite for China. It is not exactly how we do ours, but it's fairly similar. Here is how we pleat in our house:


The secret to making perfect jiaozi is to boil them and then pan fry them. By boiling them, you cook the meat and make the skins nice and soft, then you give them a quick toss in hot oil just to crisp up the skin, and you've got perfection.

These are one of my favorite go-to dishes. It's a great dish to keep in your recipe book at an easy reach.

*JC found a website that has instructions on how we pleat. It has pretty straight forward, step-by-step instructions complete with pictures. Really it doesn't matter how you fold these little guys, they will always taste delicious! Tess's Japanese Kitchen


Jiaozi

For the wontons:
  • 1 lb ground pork
  • 1 can water chestnuts, drained and chopped
  • 4 green onions, chopped
  • 2 cloves garlic, minced
  • 1 Tbsp. chopped cilantro
  • 1 egg
  • 1 tsp sesame oil
  • 1 tsp soy sauce
  • 1 tsp dry sherry
  • 1 tsp oyster sauce
  • Sea salt and fresh cracked pepper
  • 1 package GOOD gyoza skins plus 1 egg for sealing
For the dipping sauce:
  • 2 Tbsp soy sauce
  • 1/2 tsp. white vinegar
  • 1/2 tsp. sesame oil
  • 1 tsp. chopped green onions
  • Vegetable oil for frying
Mix all of the wonton ingredients together. Assemble filling with the gyoza skins and have fun pleating. Start a pot of boiling water. Gently place dumplings in boiling water and remove them as they start to float (that's when you know they're done). Be careful not to overcook them or they will get soggy and fall apart. Heat oil in a pan and place boiled dumplings in. They will splatter, so use a splatter screen if you have one. Cook on each side until browned and crispy. Mix the dipping sauce ingredients together and eat with the piping hot dumplings.

*The dumplings can easily be frozen before you boil them. When you want to reheat them, remove them from the freezer and boil them to soften again. Then you can pan fry them up and eat eat eat.

JC showing off his skillz in the kitchen

LinkWithin

Related Posts with Thumbnails