Tonight I was signed up to volunteer at the CUP Women's Clinic, but there was only one patient scheduled so I didn't have to show up. I thought I was going to be busy all night, but now that I was free, I took the opportunity to cook a wonderful meal. We also had a nice night in because our puppy was neutered today, so we have a sleepy post-op puppy to take care of as well.
To start we have a Dandelion Greens with Balsamic Vinegar Marinated Onions and Strawberries. I have never tasted dandelion greens, and like most people, I had always considered them weeds. However, I do drink dandelion tea when I am sick as directed by my personal Chinese herbalist. I found the recipe on
SeriousEats and I thought it would be perfect, with some alterations, with strawberry season. The grocery store was full of those little red gems and all of them were on sale. My strawberry plant in the backyard is also starting to grow some fruit as well. Unfortunately, the dandelion greens are extremely, extremely bitter. Apparently, they are one of the most aggressive of the bitter greens, but I was not expecting this. Like a punch in the face! I took one bite and my eyes almost started watering. I couldn't finish the greens, but I gobbled up the marinated strawberries and onions. Those were delicious. Next time I will put the strawberries and onions on a simple spinach or arugula salad, but never ever again those bitter dandelion greens.
For our main course, we had Asparagus and Fava Bean Israeli Couscous (adapted from
Culinerapy) and Beet Ravioli in Poppy Seed Butter (from
Desert Candy). They were both wonderful.
The israeli couscous was originally supposed to be a risotto recipe. But since I didn't have any risotto, risotto can take forever to make, and also that I love israeli couscous, I decided to change it a bit. Because of that, I had to alter the recipe some, but that ultimately made it even easier. The original recipe would have taken over an hour to make, my version took maybe 45 minutes. Fast, easy, delicious... that's my motto. The only thing that took a bit of time was preparing the fava beans, that can easily be left out, but it really isn't too terrible to set them up. You can clean them and study for TL at the same time (or watch Top Chef Masters...). I had never cooked with fava beans before, but the minute I heard we were getting them all I could think about was serving it with liver and a nice chianti (Alex, I know that you get my reference there).
The Beet Raviolis with Poppy Seed Butter was excellent as well. So simple to make. If you don't feel like making your own pasta dough, I used wonton skins and they worked wonderfully. The pasta was an amazing red color that looked terrific with the green of the couscous. They weren't too heavy and would be great as a main dish or a side.
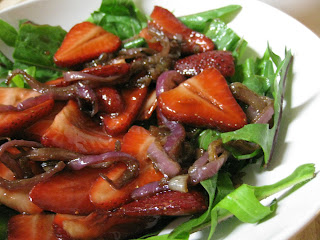
Greens Salad with Strawberries and Balsamic-Caramelized Onions
- 2 tablespoons olive oil
- 1 medium red onion, sliced into 1/4-inch-wide rings or half moons
- 10 ripe strawberries, sliced
- 3 tablespoons balsamic vinegar, divided
- 2 tablespoons sugar
- Salad greens
- Salt and pepper, to taste
1. Heat the olive oil over medium heat in a medium frying pan. Add the sliced onions along with a good pinch of salt. Cook, stirring often, until the onions are soft, lightly brown, and reduced to about 1/3 of their raw volume. You may need to reduce the heat gradually as the onions shrink.
2. Meanwhile, in a small bowl, toss the strawberry slices with 2 tablespoons of the balsamic vinegar and the sugar and set aside.
3. When the onions are nearly done, add the remaining 1 tablespoon of balsamic vinegar to the pan and continue cooking until it has thickened slightly, a minute or two. Remove the onions from the heat.
4. In a salad bowl, combine the greens, onions and strawberries with all their juices, scraping down the onion pan with a rubber spatula to incorporate all the oil and vinegar into the salad. Sprinkle with salt and pepper, toss, and serve.
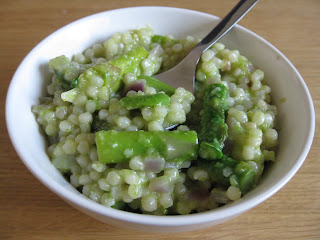
Asparagus and Fava Bean Israeli Couscous
- 1 pound asparagus, trimmed and cut into one-inch-long pieces; set aside tips
- 1 - 1 1/2 pounds fava beans, in pods (about 1 cup of shelled beans)
- 3 cups chicken or vegetable stock
- 3 tablespoons extra virgin olive oil
- 2 tablespoons butter
- 1/2 large red onion, diced
- 8 oz. box of Israeli Couscous
- 1/2 cup dry white wine
- Salt to taste
- 1 scallion, green parts chopped
- 1/2 cup grated Parmesan cheese
1. To prepare fava beans: bring a medium pot of water to a boil. Meanwhile, shell the beans by pulling on the stem of the pod, and “unzip” them on both sides. Pop out the light green beans. Take the beans and drop them in boiling water for about 4 minutes. Prepare a bowl with ice and water. Remove the beans from the boiling water and plunge into ice water to cool. Peel off the beans' waxy outer covering. Drain and set aside.
2. Refill medium pot of water and bring to a boil. Add half the chopped asparagus stalks (not the tips) and cook until quite soft, at least 5 minutes. Rinse quickly under cold water. Put cooked asparagus in a blender or food processor and add just enough water or stock to allow machine to puree until smooth; set aside. Put 2 cups of stock and 1 tablespoon of olive oil in a medium saucepan over low heat. Add the couscous and simmer covered for 10 minutes or until the couscous is soft.
3. Put 1 tablespoon of oil and the butter in a large, deep nonstick skillet over medium heat. When it is hot, add onion, stirring occasionally until it softens, 3 to 5 minutes.Add white wine, stir, and let liquid bubble away. Add a large pinch of salt.
4. When the couscous is ready, add it to the onion mix, stirring occasionally,about 2 to 3 minutes. Add more stock 1/2 cup at a time if the couscous mixture looks dry. Add remaining asparagus pieces and tips, continuing to add stock when necessary. In 5 minutes, add shelled fava beans and stir in the asparagus puree and chopped scallions. Remove skillet from heat. Add Parmesan and stir briskly, then taste and adjust seasoning. Serve immediately with additional Parmesan.
 Beet Ravioli with Poppy Seed Butter
- 4 small red beets
- 1/2 cup fresh ricotta cheese
- 2 tablespoons dried breadcrumbs
- 1 package Wonton wrappers
- 4 tablespoons (1/2 stick) butter
- 2 tablespoons poppy seeds
- Freshly grated Parmesan cheese
1. Preheat oven to 400°F. Cut off the beet greens and peel the beets. Wrap beets individually in foil; place on baking sheet covered in foil. Roast until tender when pierced with knife, about 1 hour. Open foil carefully (steam will escape). Cool. Finely grate into medium bowl. Add ricotta cheese and season to taste with salt and pepper. Stir in breadcrumbs.
2. Place a few of the wonton wrappers on your work surface, and place a small bowl of water nearby. Spoon 1 tablespoon beet filling onto each wonton wrapper. Dip fingertip into water and dampen edge of 1 round. Fold dough over filling, pushing out as much air as possible and pressing edges firmly to seal. Repeat with remaining rounds.
3. In a wide skillet, melt the butter with the poppy seeds, keep warm over very low heat. Working in batches, cook ravioli in large pot of boiling salted water until just done, about 2 minutes. Using slotted spoon, transfer to skillet with melted butter; toss to coat. You may need more butter. Place ravioli on plates; sprinkle with Parmesan if desired.


